
Doing church sound for worship – the ultimate guide part 1. If faith comes by hearing, shouldn’t our church sound systems be a priority? Many churches invest heavily in audio and media systems, and others, unfortunately, do not. Whether you’re a small, mid-size, or mega-church, church sound systems that will allow the Word and the music to be heard with detail at the appropriate level for your congregation, based on the style, culture, and make-up of your church, should be one of your highest priorities. This comprehensive guide to mixing and doing sound for worship in church will be the only guide you’ll need and the perfect training manual for your new or even mid-level sound-tech.
See Part 2 of the Ultimate Guide to Doing Church Sound here
Church Sound Systems – Components
Table of Contents:
- Component 1: The Room
- Component 2: The People
- Component 3: The Cables
- Component 4: The Snake
- Component 5: Microphones
- Component 6: Wireless
- Component 7: The Mixer
There are many things to consider when a decision has been made to improve, replace, and/or install new church sound systems. Audio church sound systems are, like any complex system, made up of many parts. The weakest link in the system would negatively affect the whole. However, replacing inferior or obsolete components of an existing system can bring it back to life.
So, what are some of the things to consider in this process? This guide will attempt to provide an understanding of what church sound systems are comprised of, the different environments they will be used in, and the level of skill required of those operating the system.
The Room
Before you set up any audio system, you need to consider the environment it will be in. Does the room have hard surfaces that can reflect the sound? (i.e. sheetrock walls, glass windows, tiled floors, wooden pews, vaulted hardwood ceilings or a metal roof with beams and columns) Perhaps it’s filled with stuff that absorbs sound like heavy drapes, carpeting, and padded chairs. It’s not that one environment is better than another, but it depends on the style of worship your church practices as to what type of room most suitable.
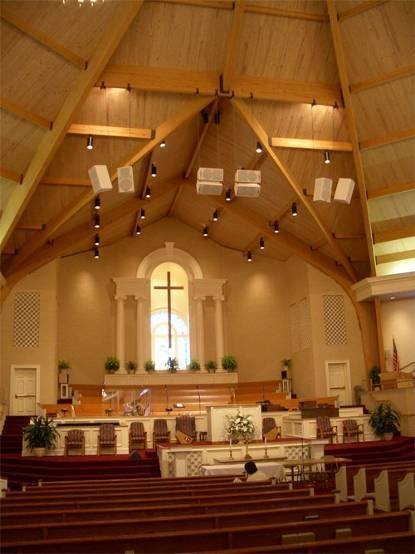
In a more traditional setting with a piano, an organ, and a choir, a more reflective, lively, and ambient environment works well (think singing in a tiled shower). However, when a modern worship band with drums, electric guitars, and floor monitors plays in highly reflective space, it can be a very difficult thing to control. Rooms that have been acoustically treated are much more suited for this style of worship. I am not saying that the room should be like the interior of a clothes closet –quite the contrary. You want some life to the room, but you don’t want to have reflections bouncing around like a billiard ball. If anybody tells you that the new sound system you’re considering will fix the problems in your room, please qualify the claim. In some cases, you may not be able to do anything to fix the room anomalies- a round, dome-shaped ceiling with glass walls, for instance. Many times, acoustic treatments that you can buy or build yourself can minimize the adverse affects of not-so-perfect sanctuaries.
This article is not a comprehensive guide to acoustics. I would highly recommend that you hire an acoustician to evaluate your church and to make recommendations before DIY (doing it yourself). They are worth the investment and can save you a lot of money downstream. Once you get the room to behave as best you can, with the resources available, the sound system will have the greatest potential to do what it was designed to do.
- Auralex is a fine company that manufactures acoustic remedies. They will even do a Free Room Analysis
- Primeacoustics is another reputable manufacturer of acoustic treatments.
The People
If you happen to be in a small church, 50-100 seats, the required skill to set-up a new church sound system will be less than it would be for 2,000 seat mega-church. The equipment needed to cover a small space is typically less difficult to connect and operate. For instance, in a portable church application, simple connections are made from a powered mixer to speakers on stands. Larger congregations in larger spaces will need to consider systems with more parts and control. What is the skill level of the one(s) who will be manning the controls? Are they former FOH (front-of-house) engineers for touring bands, or are they a full-time cop, plumber, or soccer mom with very little experience in audio, volunteering their time 1-2 hours a week running sound? Make sure that the audio components you are going to buy are going to be able to be operated by the assigned techs on your team. It doesn’t make sense to purchase equipment that has the latest, greatest bells and whistles if you can’t find them. Consider purchasing equipment that is easier to operate, whether that is a new mixing console, a new digital keyboard, electronic drums, wireless microphones/in-ear monitors, or any new technology that the church is in need of.
Please, please, please reserve a portion of your audio budget for training your tech team on a continuing basis. It doesn’t sense to have great tools if no one knows how to use them. Contact me for training opportunities, tech conferences and various educational resources that are available.
The Cables
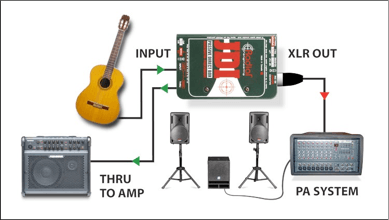
Oftentimes, sound system quality can be improved just by replacing your old worn out cables with better ones. Many churches are using an inferior microphone, instrument, and speaker cables or the wrong cables entirely. Does it make sense to purchase a new digital mixer, high-quality microphones, and loudspeakers and then connect them together with the cheapest cables? Evaluate your interconnections. Make sure you’re using the right type of cable, adapter, jack, etc. Many cables look alike but are very different. Keep the distances from the source to the destination as short as possible, especially if they are unbalanced lines. This is especially important with instrument and speaker cables. If the distance from an acoustic guitar or a keyboard to the mixing console is more than 20 feet away, please use a Direct Box to convert the high or low impedance instrument input to a balanced low impedance output so that the signal integrity will not be diminished. If you try to send the signal from the worship leader’s guitar output to a mixing console’s input without a D.I. (Direct Injection/Direct Box) more than 20 feet away, the signal will be much weaker and will have picked up noise along the way. High frequencies will also be lost.
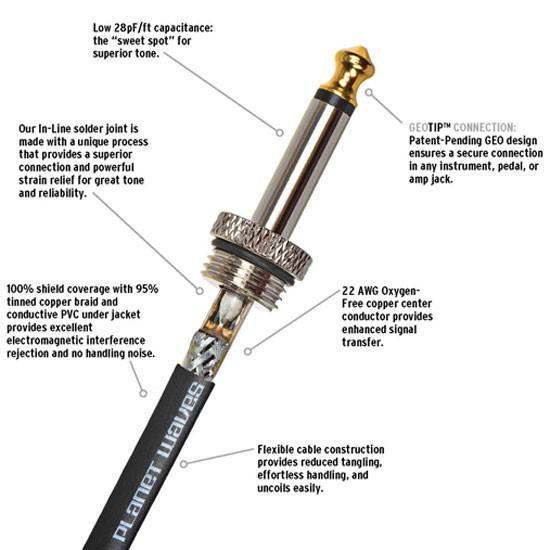
Instrument cables have ¼” jacks and can look just like a speaker cable with ¼” jack. However, they look very different on the inside. Without getting into the theory, suffice it to say that if you use an instrument cable as a speaker cable, you could potentially fry your amplifier and or harm your loudspeaker. If your speakers are passive (not self-powered) and are far away from the amplifiers, try to get the amplifiers closer to the speakers to enable a shorter run. If that’s not possible, replace with heavier gauge speaker cables to elevate signal integrity and lessen the strain on the amplifiers. We’ll talk more about passive and powered loudspeakers and what the different connections that are required in that section.
For more detailed information regarding cables, click following:
- Balanced and Unbalanced Connections
- Audio Cable Buying Guide
- How to choose the right cable for your pro audio gear
- What Direct Boxes Do
The Snake
The snake makes it easier to connect instruments and microphones from the platform/stage to the mixer. They come in a variety of lengths and channel counts. Simply, a snake is made up of multiple input/output jacks housed in a box that is labeled on the stage end, with individual cables wrapped in a jacket, extending as many feet as you need, to get to the mixer. (50”, 100’, 200’ etc) and then fans out to individual connections for the mixer’s inputs. The outputs of the mixer typically connect to the snake as well and travel back towards the stage where the outputs of the stage box would connect to the amplifiers that power your loudspeakers and monitors.
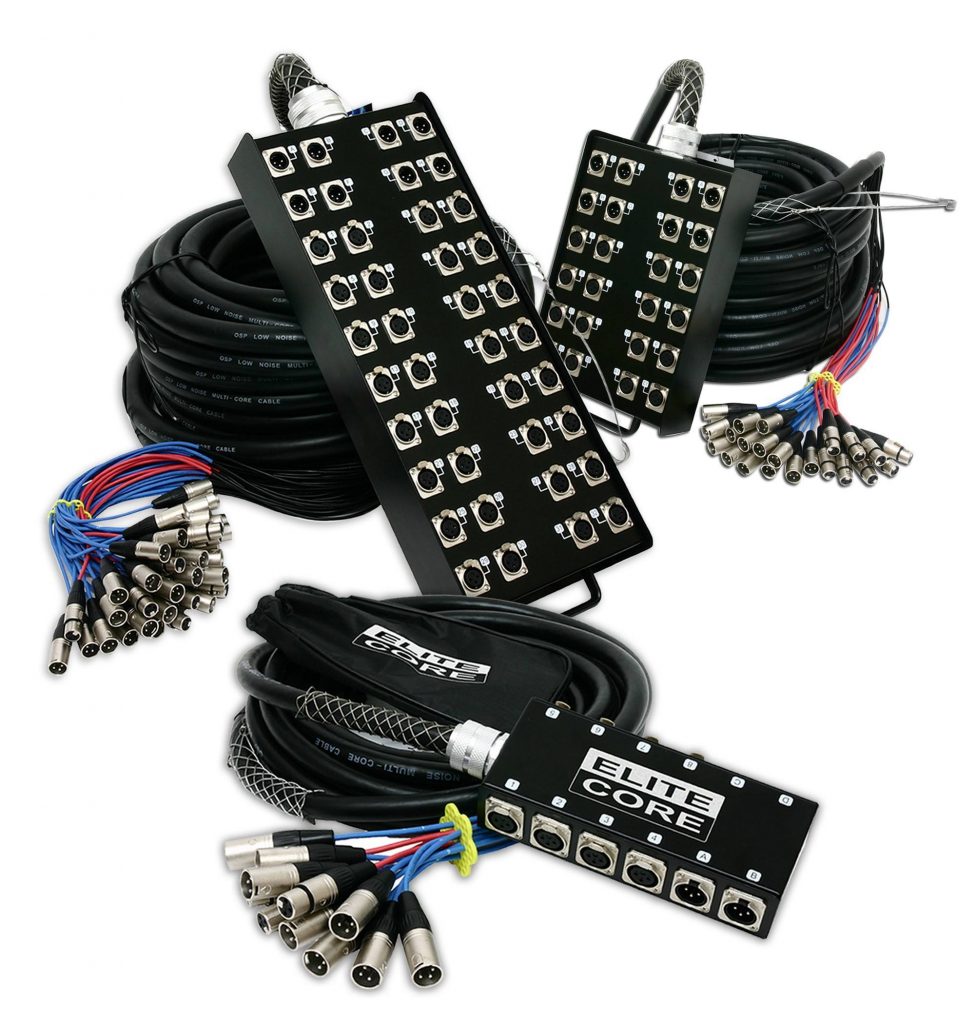
Analog snakes are traditionally what we’ve used in church and professional audio applications. For an in-depth look at what they are and why we may need them refer to the link below.
We are transitioning from analog copper snakes to digital snakes (don’t be scared) that typically use common Ethernet cables (Cat 5e/6) to transport audio (and video) as well as the control data.
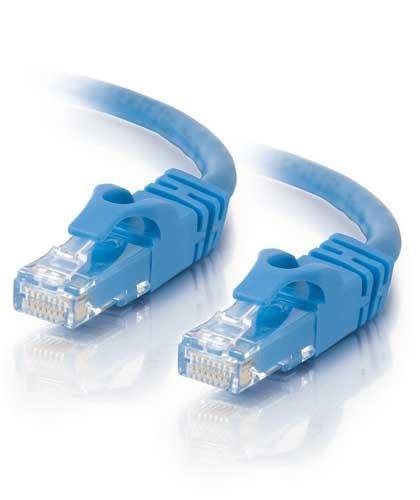
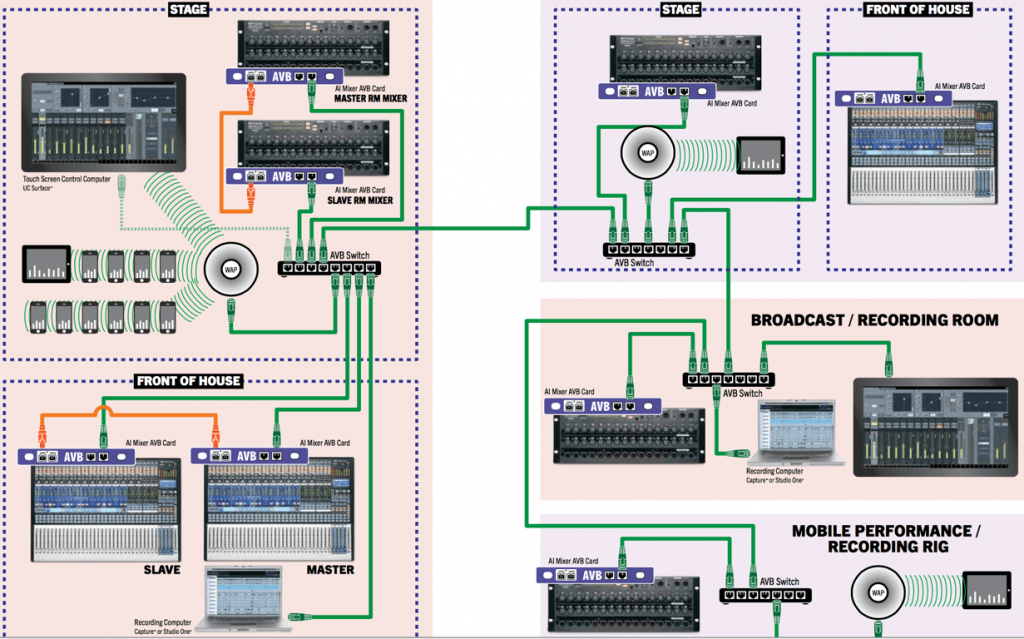
Some digital snakes are proprietary and are used with specific manufacturers’ products. Other digital snakes are a lot more universal in nature and connect with diverse brands over a network, making it much more flexible, scalable, and easier to troubleshoot. Different brands of products can talk to one another. Isn’t that nice?
Before purchasing new audio gear, determine if the equipment you are considering has this capability. The network protocols, Dante and AVB, allow you to send and receive audio and the control data to the systems different components (mixers, microphones, loudspeakers, etc) over a common, universal network. Although the two protocols are similar in nature, there are some inherent differences between the two that you investigate.
Microphones
A common question that I get asked is: What is the best microphone? I answer with another question: What is the application? The most expensive microphone isn’t always the best choice. Choosing the right type and pattern of a microphone will give the best result. The right microphone in the wrong place can wreak havoc on your audience and vice versa (feedback). Different types (moving-coil /dynamic, condenser, ribbon) and polar patterns (Omni, Directional, and Bi-directional) are suited for different scenarios and you need to do some homework to determine what type would be the best for the job. If the one you’ve chosen doesn’t work, try something else. If you get the right microphone in the right place it can save you a lot of time than trying to fix it in the mix. Take your time to move the microphone closer or a little farther away, on-axis or off. Distance and the angle will have a huge impact on the sound.
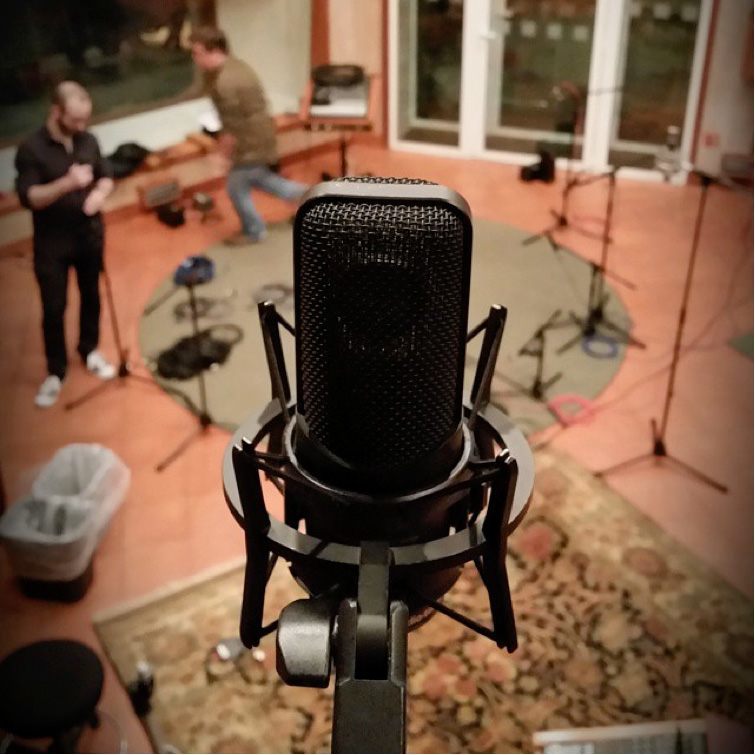
The more money that you invest in you church sound system with higher quality microphones, the better the sound will be and the longer they will last. They don’t sell high-end mics just for kicks, they’re worth every penny. Don’t cheap out here.
Dynamic microphones are the most common and will work for just about every application on the stage: vocals, guitar amps, drums and percussion and Leslie cabinets. They have limited sensitivity and frequency response but can handle high levels of input. Remember to use them closer to the source as they aren’t as effective from a distance.
Condenser microphones are more sensitive. They require phantom power (this is derived from your mixer and travels down the microphone cable to supply power to the electronics in the microphone), and are well suited for vocals and acoustic instruments because of their wider frequency response. They are the type you want for distant miking applications (Choir, drum overheads, pianos, strings, ambient/ audience microphones) Condensers have a much faster response (transient response) than dynamics and can be very effective for instruments with fast attack and release times like drums and percussion.
Better hand-held vocal microphones will have much less handling noise than a cheaper grade version. Good dynamic microphones should cost minimum $70-$100. Good handheld condensers that used to cost $200+ star at $100-$250 for a good hand-held condenser.
Clip-on microphones are great for drums, horns, and other instruments because you won’t have to buy microphone stands. Make sure the clip doesn’t hurt the instrument it’s being used on.
Don’t use a Condenser for a vocal microphone if you’re standing three feet in front of the kick drum or a guitar amp. Use a moving coil /dynamic to help reduce the level of that loud sound source from the getting into the vocal microphone. If you still want to use a condenser, use your head and either move away from loud sound sources or move to a quieter spot on the stage.
Use a head-worn microphone on the pastor instead of a lapel. You’ll get more gain and less feedback. Typically these will be condenser microphones. Lapel microphones work great for video, not so much for live sound.
Learn how to aim the microphone properly to get the desired sound and to reduce the undesired sound sources from being introduced to the system. Directional microphones can have different angles of acceptance and rejection:

Cardioid (think of an inverted heart shape; the most forgiving, widest pickup, and less sensitive to sounds directly behind the microphone)
Super and Hyper Cardioids (More narrow pick up pattern in front, on-Axis and less sensitive to other sounds about 120 degrees off axis on each side)
Floor monitor placements differ depending on the pattern of the microphone.
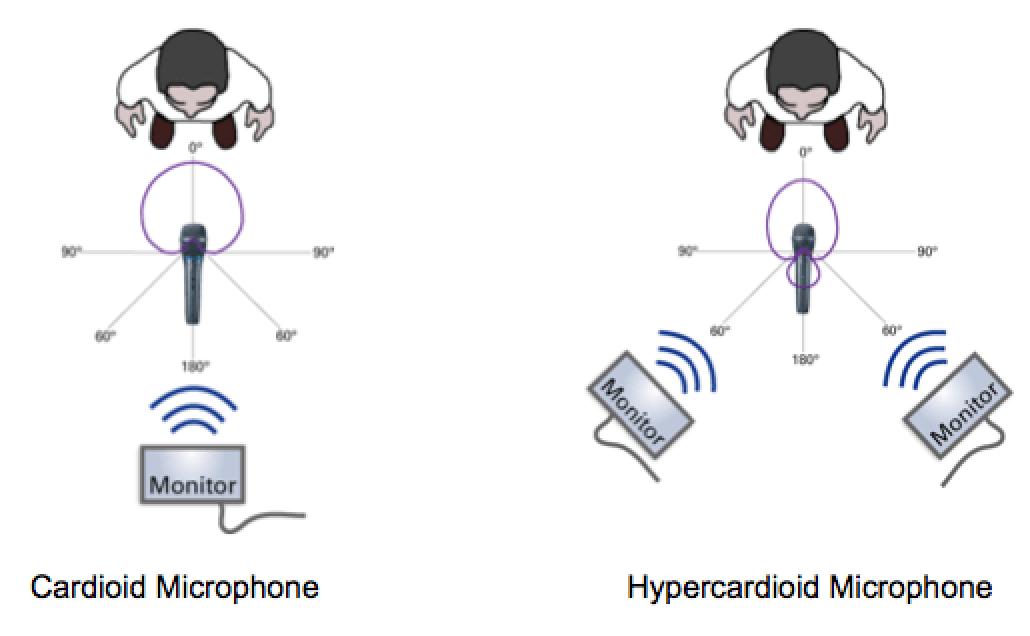
Learn some of the rules like the 3-1 rule. The Inverse square law as it applies to microphones and loudspeakers and what proximity effect is.
To learn more about microphones click the following:
- A Brief Guide to Microphones
- A Brief Guide to Microphone Selection and Use for Places of Worship
- Basic Microphone Applications (Videos)
Wireless

Make sure the reasons for choosing wireless device over a wired one are valid and practical.
The obvious and main reason for selecting a wireless microphone (or monitor) would be mobility: freedom to roam (think free –range microphones).
Other less compelling reasons would be:
- Aesthetics – We don’t see the wires all over the place.
- Speed of set-up – No cables to unwrap, connect and re-wrap.
- Safety – Please use wireless microphones if you’re standing in water just in case there is current in the pond.
Traditional, analog wireless microphones and monitors operate in the TV Bands. (UHF/VHF/DTV)
The Federal Communications Commission regulates the TV Bands and the entire radio spectrum.
Suffice it to say that there used to be a lot more room to operate our wireless stuff but the FCC has been selling off spectrum like hot real estate.
Recently we saw the FCC sell off the 700MHz band relegating many of our wireless microphones illegal or to the trash heap. Starting in May 2016, the FCC will auction off another large swath of frequencies, the 600 MHz band, to the highest bidders, typically to cellular services like Verizon, AT&T. etc.
This has caused manufacturers to research and develop innovative ways to combat the restrictions on current wireless technology and help customers who still require it. If you’re going to purchase wireless systems you need to do some homework and really consider why you need wireless and what will work now and in the future. If the reasons are compelling enough, go for it, but be smart and stay away from technologies that are going to be affected by the rising tide of regulations sweeping away the spectrum.
Digital wireless systems typically operate in the 2.4GHz band, (same as your W-Fi router) outside of the TV bands. Adding digital systems to existing analog wireless systems usually requires no frequency coordination with TV bands or existing analog wireless. In other words, if you need to add wireless systems to your set-up, these are the easiest to employ.
A digital wireless system that I really like and would seriously consider is the Audio-Technica System 10.
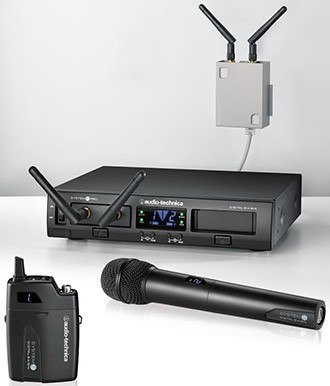
It’s sonically pristine and closest wireless I’ve heard to a microphone with a cable. It transmits 1’s and 0’s at 24-bit, 48KHz resolution (better than CD quality) It’s easy to set up (like pairing a Bluetooth device). It’s extremely affordable and has many applications (hand-held vocal, body pack for instrument, head-worn or lapel microphone, camera mount, guitar stompbox, rack or stack mount). It employs a triple diversity arrangement to assure a robust signal with time, space and frequency diversity. Analog systems are simplex. The transmitter only sends information to the receiver. This digital system uses duplex arrangement. A duplex arrangement means the transmitter and the receiver talk to each other bi-directionally. In the case of System 10, they are actually transmitting two different frequencies simultaneously (at micro-second differences in time) with spaced pair antennae. All of this is to assure a consistent, dual transmission to prevent dropouts. It works very well. There are many digital wireless systems on the market but they are not all equal. Some digital wireless systems are not intelligent and may actually take over the whole spectrum negatively affecting other devices in this range, like iPads controlling your digital mixers.
Recently I wrote an article for Sharefaith Magazine called Wired vs Wireless. You may want to refer to the article for a deeper dive into the subject.
For more information see the links below.
The Mixer
What is a mixer and why do I need one?
“Whether you have 100 members or 1,000, many modern churches need more than an organ and a choir to lead a praise service. When you add a contemporary worship band and more, you need an audio system, and the central component of an audio system is the mixer.”
At a basic level, a mixer does exactly what its name implies: mix audio signals together. If you have more than one sound source (say, five microphones, an electric guitar, a piano, and an organ), you need a mixer to combine all of these audio signals in such a way that you can control the relative balance between them and then send out your mix to one or more pairs of speakers, monitors, a recording device, and so on.
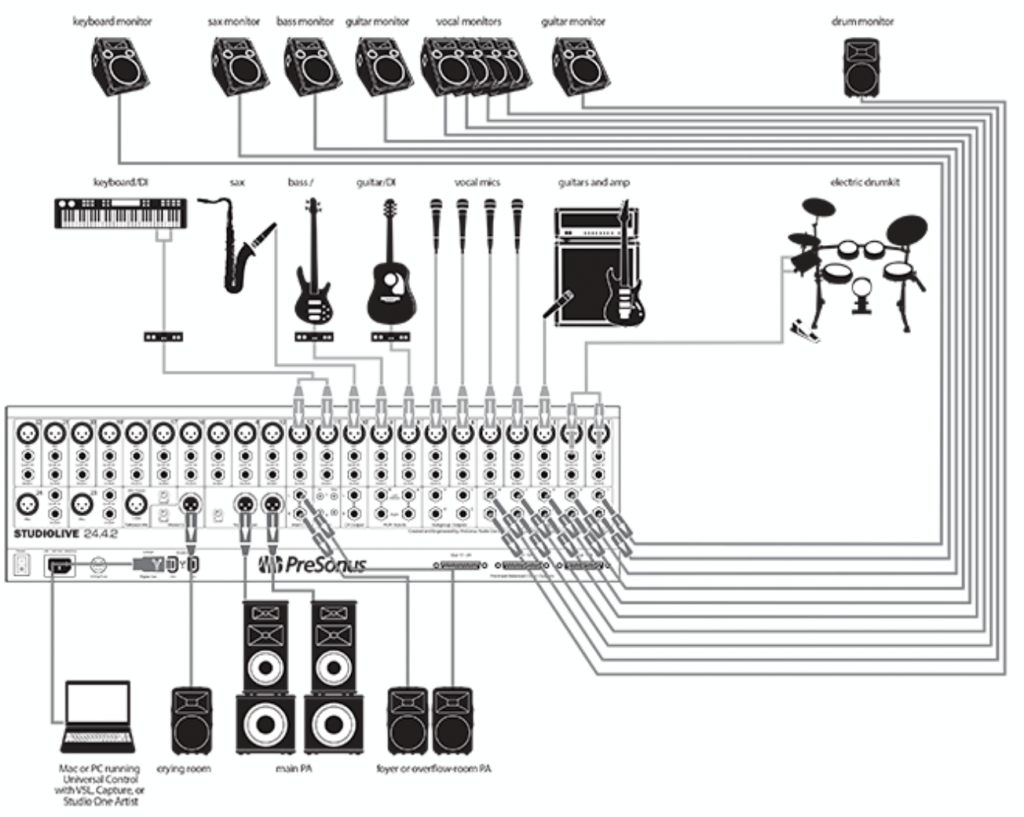
Think of the mixer as the heart and brain of any live sound system. Investing in a quality mixer as your foundation will save a lot of money on peripherals and potential headaches.
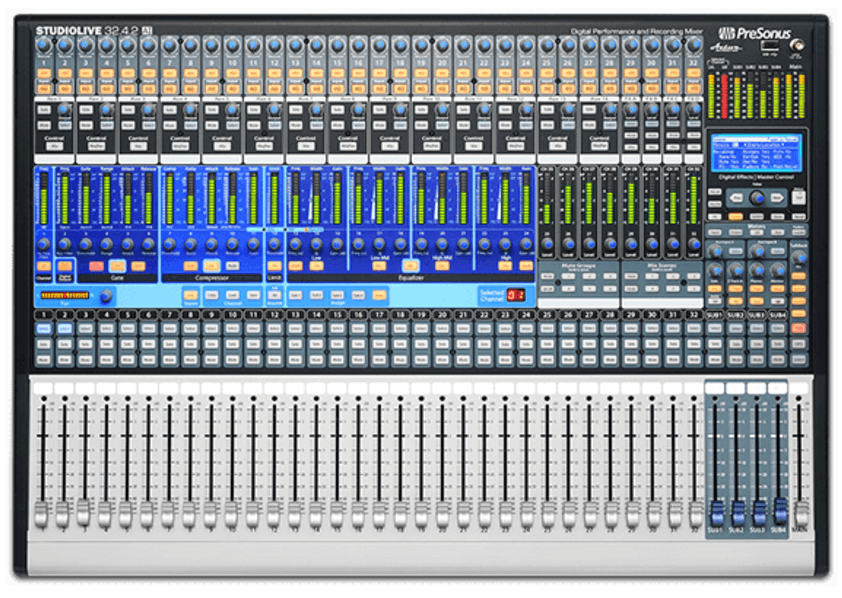
Mixers are also known as mixing boards, consoles and desks and they can come in many forms, shapes, and features with varying degrees of control over inputs/outputs.
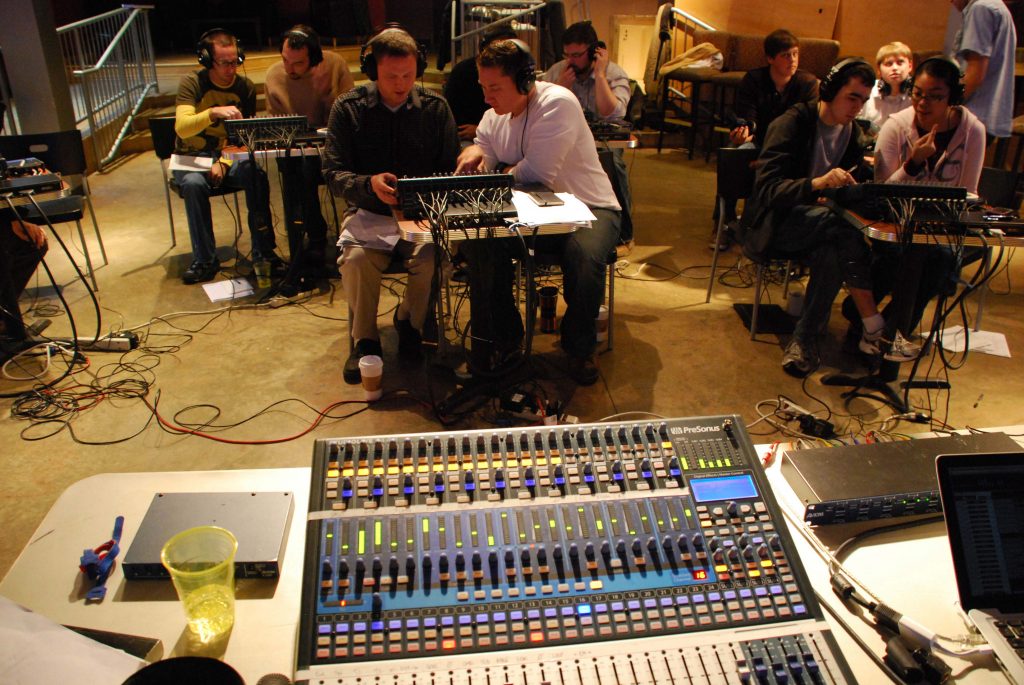
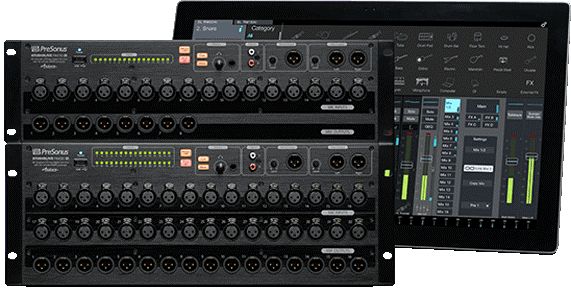
This is also a mixer (see picture below) and is placed on the stage where instruments and microphones would connect directly to it. There is now no for a snake. This allows for much faster setup in portable situations or allows the church to use it for other purposes outside of the church. It is controlled remotely with a variety of options: iPad / iOS devices, MAC/PC, All-In-One Windows computer or moving-fader control surface.
There are analog and digital mixers. Analog mixers typically offer simpler interfaces with access to levels, EQ, Aux /Bus (Monitors/Effects), subgroups, etc. A good digital mixer will allow you to avoid purchasing graphic equalizers, compressors, noise gates, reverb and delay units, recording software and computer interfaces. While you don’t need these processors to mix audio, they are essential for producing better sounding, more polished mixes.
Many churches are considering an upgrade to digital from an older analog console and may have heard that digital mixers have steeper learning curves. That may or may not be true, depending on the brand and model. I will agree some are very confusing especially to a volunteer sound tech who only mixes and hour or two a week. On the other hand, there are digital mixers that will actually help you in your quest to become a more skilled engineer and are actually easier to learn audio and to operate. Presonus StudioLive RM and AI mixers, for instance, come with 50 channel-strip presets for the most common instruments. So if you’ve never equalized or set up a compressor on a kick drum, bass guitar or vocalist, simply find the preset for the instrument in the mixer’s library and load it into the appropriate channel. Voila! You now have a starting point, which is something analog boards never had. You can now tweak the controls and get it closer to the sound you desire. At this point, you can save settings for future use. It’s almost like a digital keyboard in the sense that a musician can access a variety of preset sounds: organ, piano, strings, synth pad, brass and a nose flute in an instant.
This is only one of the many advantages of digital mixers. Being able to recall previous settings of the entire mixer from last week’s service or last year are an answer to prayer.
Where is the church mixer located and where should it be?
At a concert in a theater or an arena, you’ve probably noticed that the FOH mixer was typically 2/3 of the way back in the center of the room. The house engineer needs to be able to adjust the mix for the audience to get the best result. If he is not in the same plane as his audience, he will never hear it in the same way as they do and this is not negotiable. Many churches have positioned their mixer in some very odd places: in a balcony, in a corner on a raised platform, on the side of the stage, behind a wall or a glass window. This doesn’t work. However, one of the major benefits of digital mixers (not all) is in their ability to be controlled by wireless devices like an iPad.
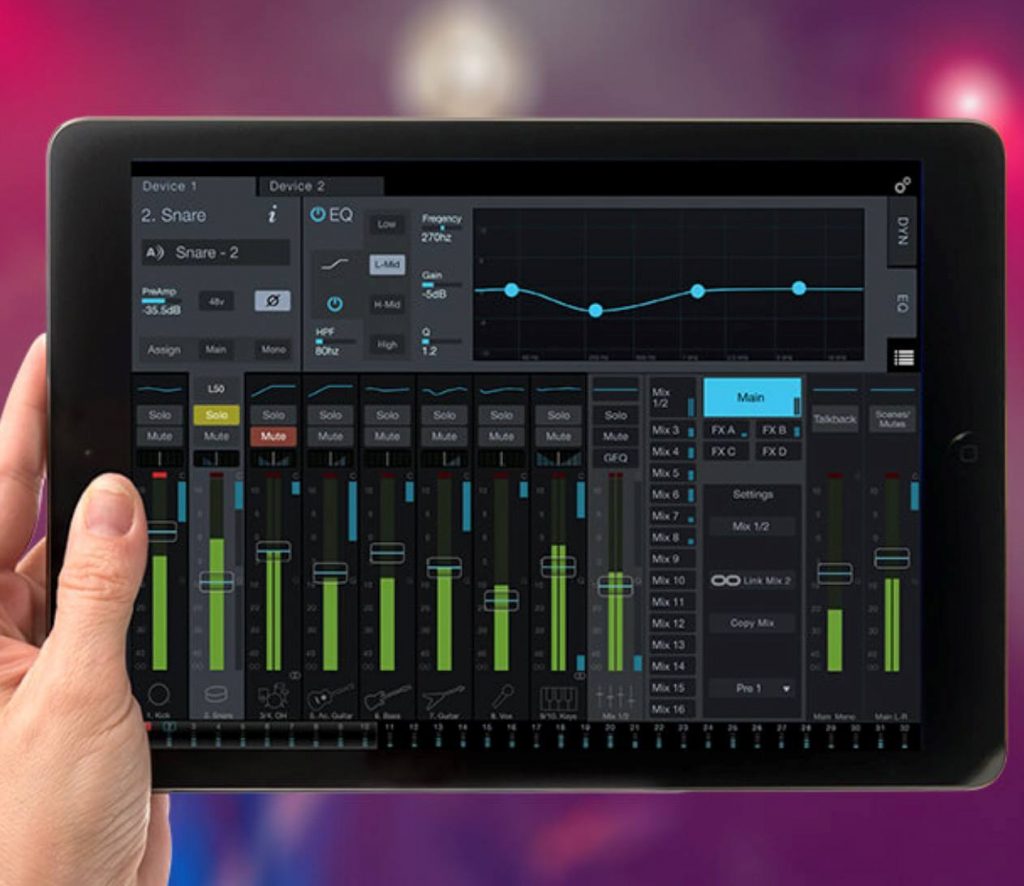
You can actually roam around the room or the stage and mix from any location in the space. Some brands have even more ways to remotely control the mix with alternative remote devices like a Mac/PC, All-in-One Windows PCs, or wireless control surfaces.
On the other hand, a digital mixer may not be the right tool for your church.
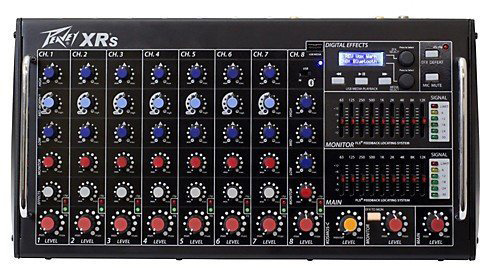
Analog mixers may be all you need. They can even come in powered varieties, which means the amplifiers for your main and monitor speakers are built into the mixer. For smaller/portable church applications this may be just what the Dr. ordered. They are easy to set up and connect and for many churches will do the job.
“Before 2009, digital mixers that would provide all these tools were out of financial reach for all but mega-churches with thousands of congregants. Now even the smallest churches can take advantage of the very many benefits of what they offer. “
My favorite feature of specific digital mixers is the ability to record the worship service on separate tracks to a Mac/PC. Once the service is recorded a sound tech could come into the church and play the tracks back through the mixer and the sanctuary audio system and practice mixing techniques for the house and monitor speakers. This is called a virtual soundcheck allowing the tech to gain more time and experience and improve his skills. Although many models have recording capability, they are not all the same. Manufacturers who design and build their own hardware and software will have a much more tightly integrated system than those who bundle third party software that wasn’t really designed for the specific hardware.
There are many more benefits, too many to mention in this overview of systems.
Next Month we will feature Part 2 of Church Sound Systems covering:
- Dynamic Processors
- Amplifiers
- System Managers
- Monitors
- Loudspeakers
- Recording
- Accessories
Continue to Part 2 of the Ultimate Guide to Doing Church Sound for Worship.

Doug Gould is a veteran of the Pro Audio and Music Technology Industry for almost 30 years serving in management roles at Shure, Tascam and E-Mu Systems and has been a worship leader, musician and tech at various churches for almost as long. He is CEO and Founder of Worship MD (Market Development) a consulting firm that helps professional audio and music technology manufacturers build relationships with the church through education.
Free eBook
Thinking about updating your church website? We can help! Download the free eBook, “10 Signs It’s Time to Redesign Your Church Website: Transforming Your Website Into a Visitor Magnet” now.
